- HOME
- QUALIFICATIONS
-
SERVICES
- General Home Inspection - Buyer
- Pre-Listing Home Inspection - Seller
- Radon Gas Testing
- Walk and Talk Consultation - Pre-Offer
- Swimming Pool Inspection
- New Construction Inspections
- Termite/ WDI Inspection
- Well Yield Testing
- Sewer Scope Inspection
- Camera Septic Evaluation
- Water Quality Testing
- Thermal Infrared Scan
- Baltimore County Rental Inspection - Licensed Rental Inspector
- Baltimore City Rental Inspections
- SERVICE AREA
- CONTACT US
- SAMPLE REPORT
- KNOWLEDGE BASE
- FAQs
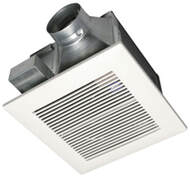
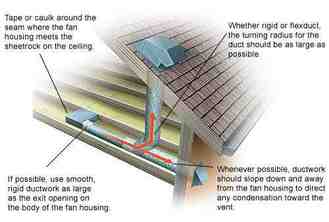
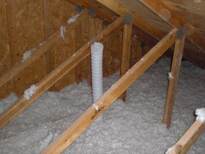 Why You Need a Bathroom Fan Bathroom exhaust fans improve air quality and comfort, and help protect your home from mold and moisture damage. The moist air produced from a bath or shower can accumulate on your bathroom surfaces. Without a proper ventilation system, you allow for rot and peeling paint and are providing an environment conducive to mold and mildew growth. A properly installed bathroom fan provides ventilation, drawing humid air and odors out of the home. Choosing Your Bathroom Fan You need to consider the size of your room to determine the cubic feet per minute (CFM) rating of the fan. The CFM rating measures the volume of air the fan moves. If you purchase a fan that is too small, it will not be effective in removing moisture from the air. For bathrooms up to 100 square feet in size, you need an exhaust fan that provide a minimum of 1 cubic foot per minute (CFM) per square foot of floor space. Industry experts recommend 60 to 80 CFM for small bathrooms and 200 to 300 CFM for larger bathrooms. When shopping for a bathroom fan, look for ENERGY STAR® ventilation options that help you design beyond code. Ceiling-mount bathroom connect to an exhaust duct that runs through the attic or between floors. Ceiling-mount fans are the most common. Wall-mount bathroom fans are designed for rooms where venting through the ceiling is not feasible. These fans typically vent directly through the wall to the exterior with little or no ductwork. Some fans will work in either a ceiling-mount or wall-mount installation. Venting Into The Attic You never want to vent your exhaust fan into the attic. Fans should exhaust directly to the exterior of the home. Take the time to ensure the bathroom exhaust vent is installed properly. This can be achieved by following building codes, providing the exhaust fan a path to the exterior through roof or exterior vent hood. Model ventilation, building, and mechanical codes require that vent fans exhaust tot he building exterior. Your attic is not a temperature-controlled environment, is never the same temperature as the living space, and is generally closer to the temperature outside. In colder weather, the warmer, moisture-laden, vented air will mix with the cooler attic air causing condensation to form. In the attic, excess moisture and heat can create the perfect condition for mold to grow. It can also cause wood rot that can destroy the structure of the home. For an example of roof vent installation, view the video below. How to Vent a Bath Fan Through the Roof | This Old House - YouTube 9/19/2022 Fall Maintenance Checklist The transition from summer to fall is the perfect time to get your home ready for colder, wetter weather. The following essential tasks can save you from having to deal with much larger problems. 1. Inspect your roof for damage. Once the dripping starts, finding the source of the problem can be time-consuming. Stop problems this fall before ice and winter winds turn them from annoyances into disasters. Start by inspecting your roof from top to bottom, using binoculars if necessary. Check ridge shingles for cracks and wind damage. Look for damage to metal flashing in valleys and around vents and chimneys. Scan the entire roof for missing, curled, or damaged shingles. Look in your gutters for large accumulations of granules, a sign that your roof is losing its coating, which can portend larger problems. Finally, make sure your gutters are flowing freely. 2. Clean the gutters and downspouts. The roof drainage system diverts thousands of gallons of roof run-off water away from the foundation. It is vital to keep this system flowing smoothly. Clogged gutters can lead to damaged exterior surfaces and can result in water intrusion into the home. They are also more prone to rust and corrosion. Remember to clean the gutters and any clogs in the downspouts. Install mesh gutter screens and downspout extensions as needed. 3. Seal air leaks. A home with air leaks around windows and doors is like a coat left unbuttoned. Gaps in caulk and weatherstripping let cold air into your warm home. According to the U.S. Department of energy, sealing a drafty house can save up to 20% on your heating bills. Weather stripping and caulk can deteriorate over time. It is important to inspect them periodically. If you suspect a problem with your weatherstripping, look for daylight through the door or window. Try closing the door or window on a strip of paper. If the paper slides easily, your weatherstripping is not properly sealing the opening. 4. Winterize hose faucets and lawn irrigation systems to protect them from freezing temperatures. Take steps to ensure that outside faucets and in-ground irrigation systems do not freeze and burst. Close any shut-off valves serving outside faucets, then open the outside faucet to drain the line. There may be a barrel adjuster cap on the shut-off valve to facilitate this draining. If you do not have shut-off valves, and the hose faucets are not frost-proof, Styrofoam faucet covers can be used. Follow the manufacturer's procedure for winterizing and protecting lawn irrigation systems from winter damage, or hire a lawn irrigation system company to properly winterize the system. 5. Replace the HVAC filter. HVAC filters trap dust that would otherwise be distributed throughout the home. Clogged filters affect system efficiency, can make it difficult to keep your home at a comfortable temperature, and can result in increased utility costs. 6. Service the heating system before the heating season. It is a good idea to have your heating system inspected and serviced by an HVAC professional annually. To avoid the last-minute rush, consider scheduling this task in early fall before the heating season begins. 7. Have a certified chimney sweep inspect and clean any flues, chimneys, and fireplaces. All flues, chimneys, and fireplaces should be inspected by a certified chimney sweep annually. Fall is a great time to have this done before the heating season begins. A certified chimney sweep can provide a determination of interior condition and can ensure that flues, chimneys, and fireplaces function properly and safely. Call Stavlas Home Inspections at 410-428-5507 to schedule your next home inspection or schedule online at www.stavlasinspections.com. Schedule Now |
AuthorJohn G. Stavlas has been performing home inspections for over 5 years. ArchivesCategories |


 RSS Feed
9/30/2022
0 Comments